Post-Mortem: Replacing the default reverse proxy on Synology NAS
The full process of replacing the default reverse proxy on a Synology NAS; the issues I encountered and how I resolved them.

Over the weekend, I set out to replace the default reverse proxy on my Synology NAS. Don't get me wrong, the reverse proxy works great for basic needs, but my needs are just slightly above basic, so the default one just didn't cut it.
For context, my Synology NAS is the brain of the house. I have 20+ services running off of it - e.g. home automation, media acquisition (if you catch my drift) and media streaming, Dropbox replacement, coding server (Jupyter / VSCode), DNS Server, recipe board, ad blocking, etc...
I want to be able to access all these services without having to remember the IP address & port that they're running from.
This is a write up of what I tried to do, issues that I ran into, and how I resolved them.
There's a TL;DR at the bottom.
Objectives:
- Spin up a reverse proxy to forward queries to the relevant services within my home network (e.g. http://jellyfin.lan will take me to my Jellyfin service at 192.168.0.100:1234)
- The reverse proxy used will be NGINX Proxy Manager
- A separate IP address is needed for this as port 80 on the Synology host is already used by the default reverse proxy.
That's it, let's keep it nice and simple. (spoiler alert: that was not my experience going into this, but I hope this write-up can save you from a few gray hairs)
Vision:
I'm a visual learner, so it was important for me to have a visual diagram of how I want things to work, and re-adjust as I go along until I get the full picture.
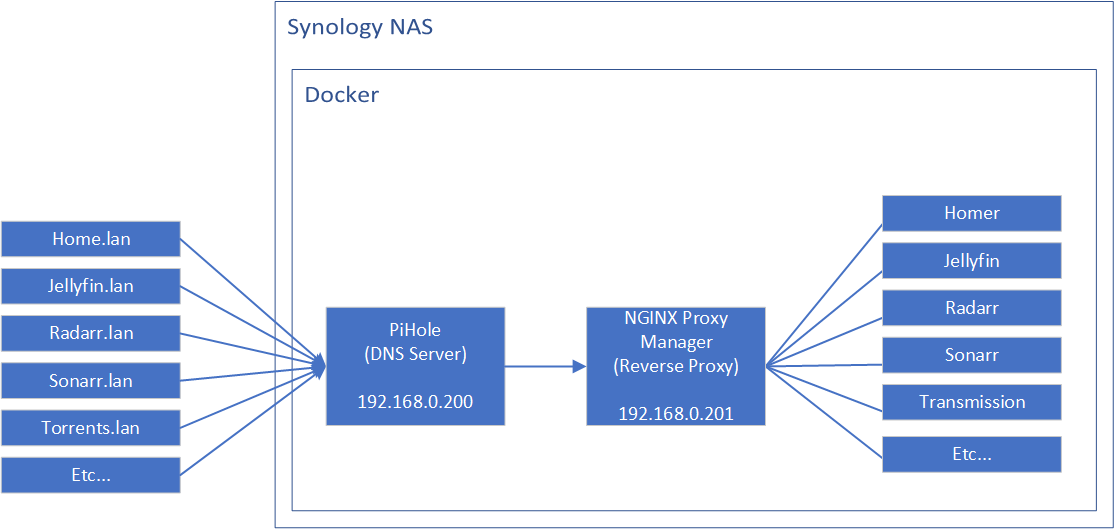
The flow should be:
- As the end user, I can type in http://serviceName.lan/ into my browser
- My DNS server (Pi Hole) will pick up that request, and point the request to the IP address in the DNS record - that would be the reverse proxy's IP
- My reverse proxy will then resolve the domain serviceName.lan and show me the service hosted on the relevant IP and port, e.g. 192.168.0.100:9000
Setting up Nginx Proxy Manager in Docker
I used Docker and Docker-Compose to set up Nginx Proxy Manager; a docker-compose.yml file can be found below (a simplified version of my final stack).
- Create a folder to store the reverse proxy files:
/volume1/docker/npm(or wherever you normally store your docker data) - Create a file called
docker-compose.ymlwithin this new folder (see below) - Create 2 sub-folders called
dataandletsencrypt - Run command
docker-compose up -d
Docker-Compose.yml:
version: '2' # version 2 is necessary. v3 does not support ipam

services:
 proxy:
   image: 'jc21/nginx-proxy-manager:latest'
   container_name: proxy
   restart: unless-stopped
   networks:
     macvlan_network:
       ipv4_address: 192.168.0.201
   ports:
      # Public HTTP Port:
     - '80:80'
      # Public HTTPS Port:
     - '443:443'
      # Admin Web Port:
     - '81:81'
   environment:
     - DB_SQLITE_FILE: "/data/database.sqlite"
   volumes:
     - ./data:/data
     - ./letsencrypt:/etc/letsencrypt

networks:
 macvlan_network:
   driver: macvlan
   driver_opts:
     parent: ovs_eth0
   ipam:
     config:
       - subnet: 192.168.0.0/24
         gateway: 192.168.0.1
         ip_range: 192.168.0.200/30
Docker-compose.yml explained:
- A container called
proxyis to be created, using the imagejc21/nginx-proxy-managerwith the taglatest - SQLite database is used
- I am creating a new Docker macvlan network called
macvlan_network - The new network is linked to
ovs_eth0(the ethernet switch on my NAS, you can check yours by typingifconfigin terminal) 192.168.0.201is the IP I am assigning to the reverse proxy container192.168.0.200/30is the IP range for this Docker macvlan
Issue: multiple Docker MacVLANs
If you don't have a pre-existing Docker MacVLAN, then this is a non-issue, and the above steps should work for you.
I ran into this error whilst spinning up the Docker container:
Failed to allocate gateway (https://192.168.0.1): Address already in use
Turns out, I can't have more than one Docker MacVLAN for each gateway / network switch! I already had one for PiHole so it's not letting me create another one for the reverse proxy.
Solution: Use the existing MacVLAN that I created for PiHole
I added the reverse proxy to my PiHole docker-compose stack and just assigned it with an IP address. So now both my PiHole and NGINX Proxy Manager are in the same stack and using the same MacVLAN, just with different IP addresses.

You can, of course, do this in different ways. e.g. rather than setting up network AND the services within the same docker-compose file, you could try setting up a standalone Docker macvlan, then in your docker-compose files just reference this network and assign an IP.
FYI: This is my final docker-compose file:
version: '2' # version 2 is necessary. v3 does not support ipam

# Reference: https://www.reddit.com/r/synology/comments/gmfta3/pihole_5_on_synology_using_docker_simplified_with/

services:
 pihole:
   container_name: pihole
   image: pihole/pihole:latest
   networks:
     macvlan_network:
       ipv4_address: 192.168.0.200
   #cap_add:
   #  - NET_ADMIN # add if using DHCP in pihole
   volumes:
     - "./pihole/:/etc/pihole/"
     - "./dnsmasq.d/:/etc/dnsmasq.d/"
   dns:
     - 127.0.0.1
     - 8.8.8.8
   ports:
     - 443/tcp
     - 53/tcp
     - 53/udp
     - 67/udp
     - 80/tcp
   environment:
     TZ: Europe/London
     ServerIP: 192.168.0.200
     WEBPASSWORD: !WebPass1234! #change this!
   restart: unless-stopped

 npm:
   image: 'jc21/nginx-proxy-manager:latest'
   container_name: proxy
   restart: unless-stopped
   networks:
     macvlan_network:
       ipv4_address: 192.168.0.201
   ports:
      # Public HTTP Port:
     - '80:80'
      # Public HTTPS Port:
     - '443:443'
      # Admin Web Port:
     - '81:81'
   environment:
     DB_SQLITE_FILE: "/data/database.sqlite"
     DISABLE_IPV6: 'true'
   volumes:
     - ./npm/data:/data
     - ./npm/letsencrypt:/etc/letsencrypt

networks:
 macvlan_network:
   driver: macvlan
   driver_opts:
     parent: ovs_eth0
   ipam:
     config:
       - subnet: 192.168.0.0/24
         gateway: 192.168.0.1
         ip_range: 192.168.0.200/30
Configuring the local DNS server
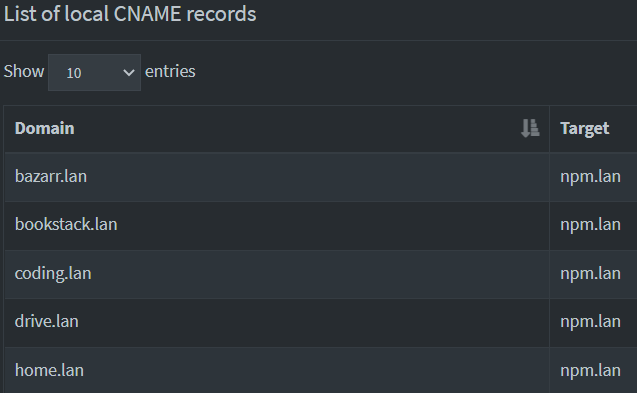
I then setup multiple DNS entries on my Pi Hole:
- A records: npm.lan --> 192.168.0.201 (IP of my Nginx Proxy Manager container)

- CNAME records: add the addresses for your services as cname records for npm.lan, so that all of them will be pointing to the same reverse proxy. And if the reverse proxy IP needs to be updated for whatever reason, I just need to update the A record for npm.lan.
Configuring Nginx Proxy Manager
Now that the Nginx Proxy Manager container is up and the DNS server has been instructed to direct requests to the reverse proxy, let's login and set up the reverse proxy itself.
- Visit
192.168.0.201:81 - Login as
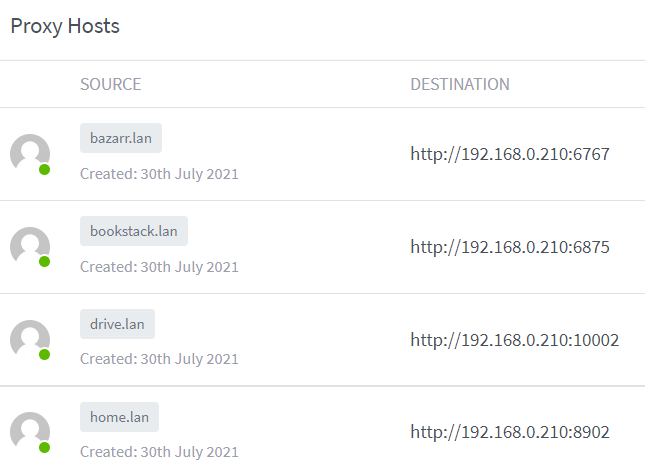
[email protected]with passwordchangeme. You'll be asked to update this on first login. - Setup the proxy hosts by pointing the source URL to the relevant destination*, e.g. home.lan points to 192.168.0.6:5000
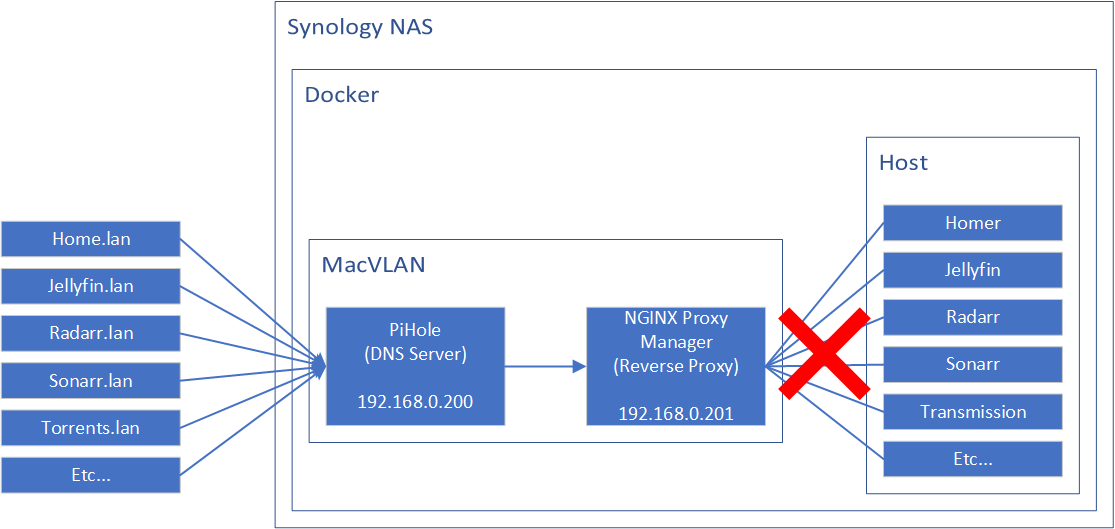
Issue: containers in MacVLAN cannot communicate directly with the host
In my setup, both the reverse proxy service and the other services were all on the same Synology NAS. Unfortunately (or fortunately? depends on what you want to achieve I guess), by default, MacVLAN cannot communicate with the host as they are isolated networks.
So that means the current reverse proxy routes don't work.
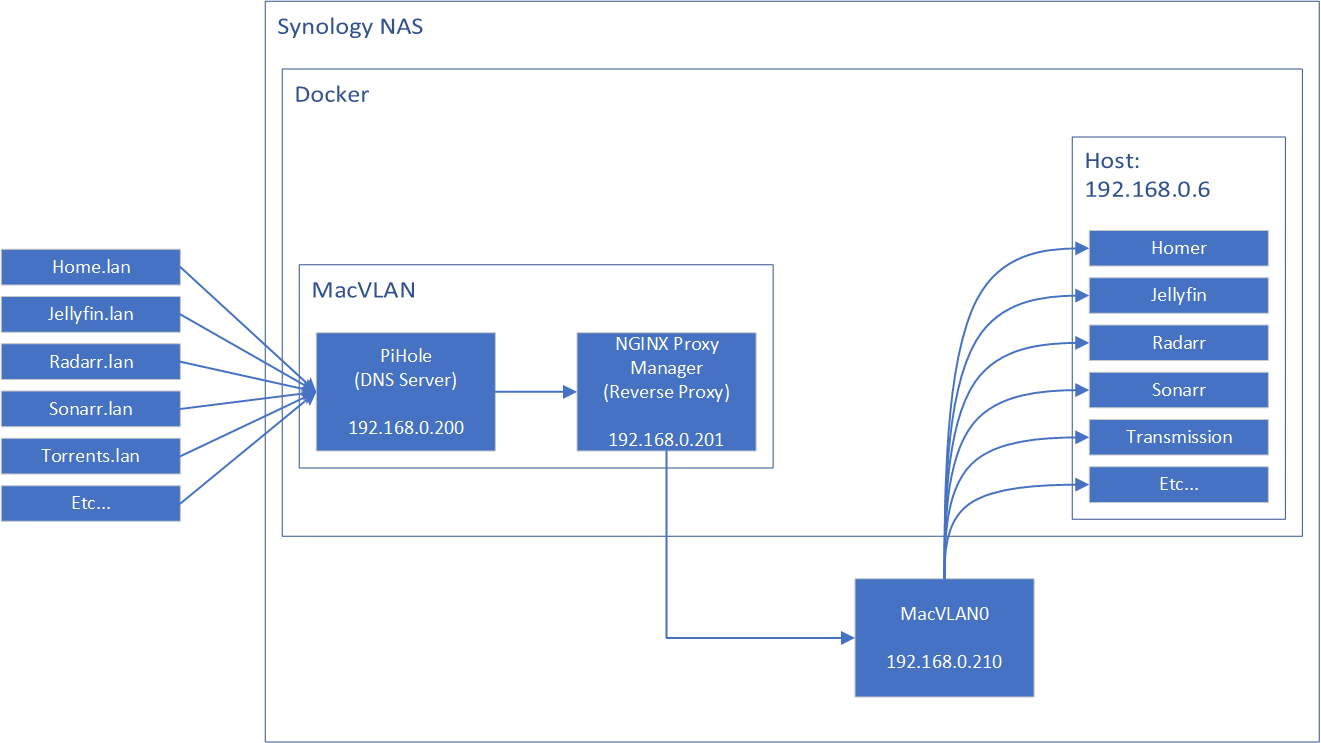
Solution: Creating a MacVLAN bridge on the host
Create a new virtual network bridge (a MacVLAN) on the host itself (i.e. the NAS), and then open a route to the reverse proxy container.
- Create a macvlan called
macvlan0
sudo ip link add macvlan0 link ovs_eth0 type macvlan mode bridge
- Assign the IP
192.168.0.210tomacvlan0
sudo ip addr add 192.168.0.210/32 dev macvlan0
- Make the macvlan active
sudo ip link set macvlan0 up
- Open up a route to the reverse proxy container
sudo ip route add 192.168.0.201 dev macvlan0
Configuring Nginx Proxy Manager, again
OK, let's try that again.
I updated the reverse proxy entries by pointing them to the macvlan0's IP instead of the host IP.
Aaaaaand it works! Reverse proxy successfully replaced.

MacVLAN - surviving restarts
Now that I have proven the approach works, I need to make sure the MacVLAN that I created on the NAS is able to survive restarts. So I created a little script with the commands above and made sure it ran when the NAS starts up (using Task Scheduler).
macvlan.sh:
- Create a file called macvlan0.sh
sleep 60
ip link add macvlan0 link ovs_eth0 type macvlan mode bridge
ip addr add 192.168.0.210/32 dev macvlan0
ip link set macvlan0 up
ip route add 192.168.0.201 dev macvlan0- Make it executable
chmod +x macvlan0.sh
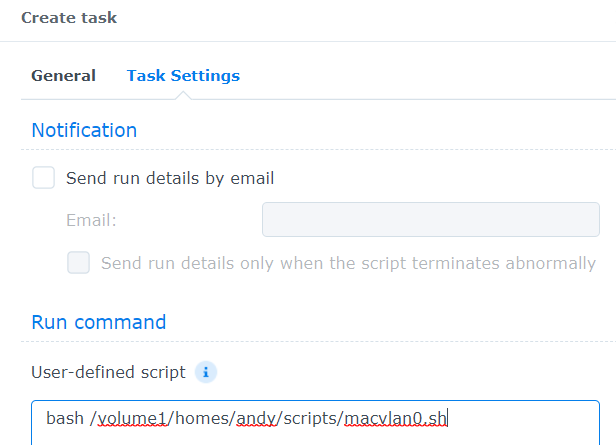
Task Scheduler:
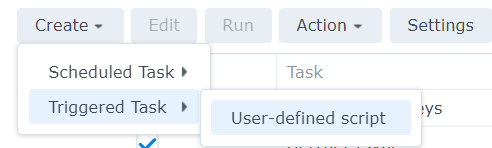
- Open up Task Schedule on the NAS, and then click on Create --> Triggered Task --> User-defined script
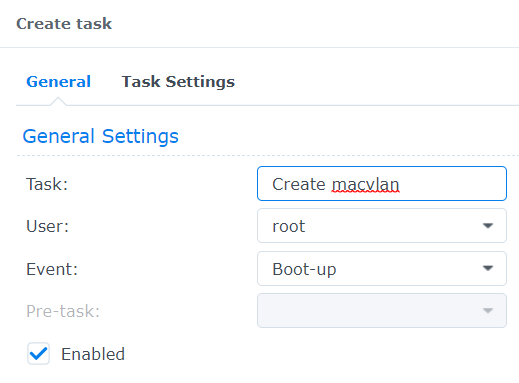
- Enter a name for the task, and make sure the user is set to root.
TL;DR
- I wanted to replace the Synology reverse proxy with Nginx Proxy Manager (NPM)
- A new IP was generated for NPM by creating a macvlan on Docker (as port 80 was already taken up by the existing reverse proxy)
- Found that containers in a Docker MacVLAN cannot communicate with the containers on the host, so reverse proxy didn't work
- Fixed it by creating a MacVLAN on the host itself, and then opening up a route to the reverse proxy
- It worked.